Today I am going to share with you a tutorial for making a junk journal to use as an art journal. I didn’t buy a single thing for this journal – and that’s something we can all like about it!
Some paper scraps, a pair of old blue jeans that don’t fit anyone anymore, and a little time is all it took! It’s easy and fun to do, so I hope this tutorial will inspire you to learn how to make your own journal!

Here’s How to Make Your Own Junk Journal From Materials From Around the House
Step 1: Gather your papers.

I went through my stash and found 26 scrap papers. File folders, envelopes, scrapbook paper, papers I had painted previously, cardstock…really anything I had lying around the house that was roughly around 8.5 x 11 inches.
If you have the ability to choose what paper you use, I would recommend watercolor paper – it stands up the best for art journaling! But, mixed media paper and cardstock and file folders will work well too though may require some prepping when you go to create on them.
Shown above are some examples of the papers I choose to use for creating my journal. There’s a mix of old junk mail envelopes, blank cardstock, watercolor paper, and even a few sheets of scrapbooking paper.
Step 2: Fold each paper in half.

Once my papers were gathered, I folded each one in half.
Tip: a butter knife works REALLY well in making this a fast easy process and ensuring a clean fold.
Step 3: Separate Into Signatures

Signatures are basically like sections of the book. They are created by taking several of the papers that are folded in half and putting them inside one of another.
Ideally a signature in an art journal should have no more than 8 pieces of paper if you want it to lay relatively flat when you open the book. So, I divided my 26 papers into 5 signatures, with each signature having 5-6 papers each.
Step 4: Poke 5 Holes Into the Paper

To create this journal, I am using a simple bookbinding technique called the 5 hole pamphlet stitch.
To do this, I poked 5 holes spread relatively evenly apart in the folded part of each page. A way to make this easy is to poke your holes in one piece of paper, and use that as a template for matching holes in the other pieces of paper.
An awl comes in handy for this task, but a strong needle will work fine too.
Step 5: Cut out a strip of denim that is about 5 inches wide. Place your cardboard on top.

I used a pair of blue jeans that belonged to my kids that fit no one anymore. And the cardboard? That’s the back of a watercolor pad I had saved just for this purpose!
Step 6: Spread Adhesive on Cardboard

I used gel medium – Elmer’s or Arleen’s tacky glue would work fine too.
Once the adhesive is on the cardboard, then press the denim firmly.
Step 7: Repeat on the other side with another piece of denim so you have denim on both sides of the spine.

Basically you just do Step 6 but on the reverse side!
Step 8: Thread Your Needle.

It’s important to use a strong string. Waxed linen is what most book binders recommend, but twine or embroidery floss will work too. You want something you can pull on that won’t snap. You’ll also want to make sure your needle is not too big but big enough for the holes.
Step 9: Sew in the Signatures

Once the cover is together, the next step is to start with a signature and sew it in. I start with a knot in the bottom hole on the inside of the signature and then thread through the holes and the denim spine so it looks like something like this:
You’ll basically do this for each signature starting in the front and working your way to the back until you have 5 signatures sewn into the spine of your journal.
Design Sponge has an awesome tutorial on a 5 hole pamphlet stitch though you can find here: 5 Hole Pamphlet Stitch
Step 10: Admire Your Work!

My book is by no means perfect. I rather like it that way.
I added more denim to the outside cover. Here’s a view of the inside.
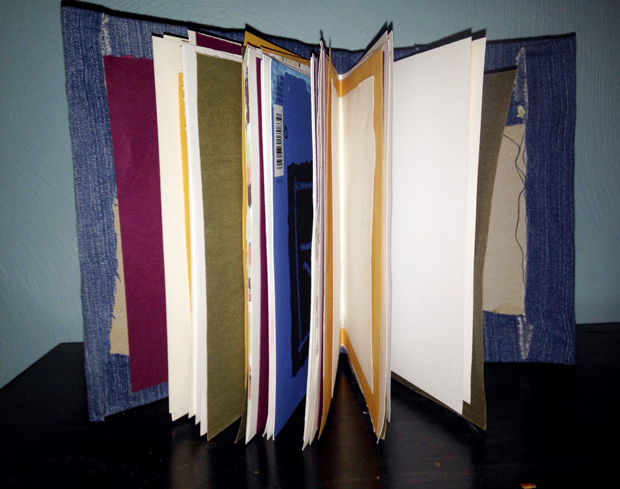
What a wonderful mish mash of various papers!
You can create a journal just about anything you have on hand. This is a great way to use up old papers you may not ordinarily know what to do with and transform them into a great journal you can use for creating art!
If sewing a journal seems like a lot of work or maybe something you don’t want to do, you may also want to check out my elusive perfect no-sew junk journal bookbinding tutorial. It’s how I make most of my journals now and it’s super easy!
I hope you find this tutorial helpful – and of course if you have any questions just ask in the comments below!
Join our facebook group!

Share what you’re creating and working on, ask questions + connect with over 4000 creative artjournalists for inspiration + ideas!
Love the tutorial…..what a great way to use ‘old’ jeans…..
Thanks Chelle..we are always on a tight budget. I actually found a big old book at the thift store,, leather bound. I plan to use if for 52/2015. It has the old fashion non gloss paper which is getting hard to find (thick pages) but i have a sketch journal…it fell apart and i wonder if i can utilize part of this process to make it into a journal? Your ideas and demonstrations have helped me so much..thank you again!
That is so great! I have been preparing but always get scared when it comes to the spine part. Hhhmmmm will try the stitching after the holidays =D
Thank you Chelle – I love this idea – and may be spending my new year’s day making one- I have a Stillman & Birn -with and just looked and it has exactly 26 sheets – 52 pages – after all these years I’m wondering is that standard? Most likely is and I have been filling them without counting them!
Happy New Year – see you in 2015 –
kathleen
I don’t have any old jeans on hand (we just downsized into a 30ft RV!) But I do have some sample books of beautiful upholstery material. Not as big as what you did here, but I think I’ll try your technique and make some smaller ones. Well see how it goes! LOL
Looks great, but I don’t understand how you’re attaching the signatures to the spine. Thanks!
Anne
Hi Anne, in this journal the signatures are sewn in – we also have a tutorial for our easy peasy no sew junk journal where you can use elastic bands to attach the spine. Hope that helps!