You probably remember Composition Notebooks from school. While they used to have only one design – a marbled black and white cover – they come in all types of shapes and sizes these days.
I purchased my Composition notebooks at Wal-Mart. because I’m a bargain shopper 🙂 It’s best to stock up during back to school sales. but they are only like 94 cents regular priced so it won’t break the bank too much!
The important thing about choosing a composition notebook for altering is making sure it has sewn pages. Most do, but I’ve seen ones that don’t so be sure to check!

Once you have the notebook, you’re going to want some other supplies:
PVA Glue (Regular Elmer’s will work also) or Gel Matte Medium
I started using gel matte medium in mine – which works really nicely- but I was going through a lot of it so switched to Elmer’s white glue – can’t really tell too much a difference between which pages used the gel matte medium and which ones used Elmer’s – so use whatever your budget allows for and you prefer!
A big fat craft “Popsicle” stick or a credit card:
I used a jumbo sized craft stick for smoothing pages down and spreading the glue around on my papers – an old credit card/gift card would work well too.
Old Scrap Paper for Thickening Pages:
The original pages in a composition notebook are very thin. We want to thicken them up a bit, so you’ll need some sort of paper to cover each page with. I used a combination of old book pages and some leftover scrapbooking paper – but you can use pretty much anything!
Newspaper can also work well this – I’ve also seen some people use pages out of the phone book in some other tutorials I’ve seen. Just use whatever you have handy and don’t worry about buying any supplies..
Optional Supplies: Hole Punch, Ribbon – to tie the book closed. Gesso – to cover the pages before you start creating in the journal.

Step by Step Intructions for Altering a Composition Notebook
Step 1: Begin by ripping out every other page.
You’ll find once you reach the half way mark the pages you already ripped one half from will come out very easily. Then, start back at the beginning and rip out every 2-3 pages again. It’s up to you really how many pages you want your journal to have.
I’ve found about 30-35 (for a total of 60-70 pages if you count the front and back) is a good number – not too bulky or intimidating to finish! Be sure to save the pages you ripped out – they can be used later as journaling blocks and I will definitely be using them in the junk journal tutorial I’m planning in a few weeks!
Step 2: Make the Papers Thicker by Adding Collage Layers

Once your pages are ripped out, you’re ready for the sticky gooey fun part! I like the shabby collaged ripped effect – you can make this as neat or as messy as you’d like!
I started by just ripping out pages from a couple of old books I had (one I am planning on altering and would be ripping pages out of anyways) – as well as tearing up pieces of the scrapbook paper.
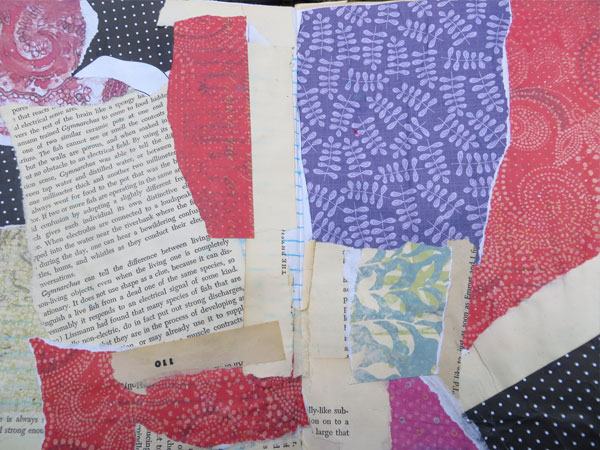
I did my pages very haphazardly – if you prefer something neater or cleaner, you can cut out paper strips to the exact dimensions of the book and glue them down that way, or you can cut out squares, rectangles, circles, etc. etc. The only real limit is your imagination!
I used a jumbo craft stick to spread the glue around on the papers before sticking them down, and then pressed the jumbo craft stick against the papers to flatten them out and get rid of any air pockets.
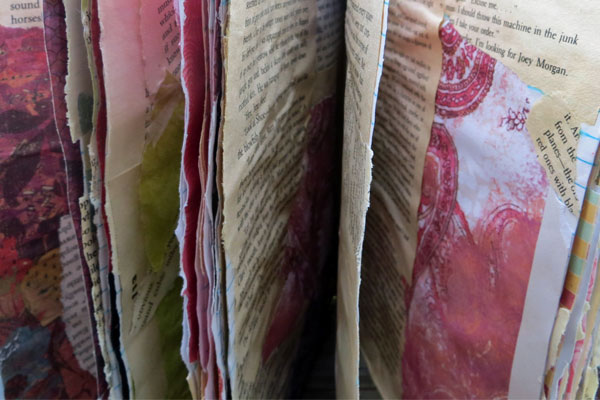
This seemed to work really well and I didn’t have to worry about ruining any brushes! You’ll see some of my pages are still a little wrinkly…that’s OKAY! My journal here is going to be about letting go and to stop trying to be perfect about everything, so I think the wrinkles add to the story I plan to tell as well as add some really nice texture.
You’ll notice I didn’t go all the way to the center on some of these – that’s okay! Nothing a little gesso and/or washi tape can’t fix. 🙂
Tip: Use wax paper in between pages as you are working on them so they don’t stick together while drying!
Step 3: Paint/Gesso over the pages if you’d like

Just look at the texture here! I used a credit card to spread the gesso, again because it’s terribly hard on brushes.
I can’t wait to start creating over this awesome background!
If you want your pages to show through more of the collaged background – just use plain craft paint, as that will be a little more translucent and not cover it up as much as the gesso. And don’t feel like you have to use the color white either – use any colors you want!
Step 4: Decorate the Cover:
I usually do the cover absolutely last because it is inevitable I will splash paint all over it at some point (I am very clumsy, lol) – the cover can be done in the same way we thickened the pages, or you can cover with gesso and paint over it.
The cardboard covers on these composition notebooks are not real thick or high quality – so you may want to cover with paper first and then paint over it – plus adds lots of fun layers to your work!
When my journal is complete, I am going to take a hole punch (or a screw punch if you have one of those!) and poke a hole on the front and the back cover of the journal to tie a ribbon so it stays shut. You can also use rubberbands to achieve this – that works just as well also.
 [symple_divider style=”solid” margin_top=”20px” margin_bottom=”20px”]
I can’t wait to start creating in this altered composition notebook journal and will be sure to post some more photos of the project as I complete more pages!
What Are Your Thoughts?
I hope you enjoyed this little tutorial on making an altered composition notebook art journal – and if you have any different techniques or tips you’d like to share I’d love to hear them!
And if you make a composition notebook journal – please do share your project in our Facebook Group – I love seeing everyone’s work!
Join our facebook group!

Share what you’re creating and working on, ask questions + connect with over 4000 creative artjournalists for inspiration + ideas!
This is an amazing tutorial. I have an old composition book that I’d love to alter…will be adding this to my art to-do list! 🙂 Thanks!
You’re welcome!
This is a great tutorial. I found you through Pinterest. I have extra composition books laying around since we always buy extras at back to school time. Even that one little line about using wax paper between pages is like a little gem to me. I kept wondering how you could do more than a page or two at a time without everything sticking together. Thanks so much for this! I’m off to check out the rest of your blog.
Diane
Thanks Diane! Glad you found it helpful 🙂
Thank you, i have to have an art journal for school except i need at least 100 pages so if i took ur idea and used an old book like a textbook it would be a cheap way to turn in my journals
i am obsessed with you blog!!! such an inspiration!!!!
Thanks! Looking forward to keep adding more for 2014! 🙂
Hi Chelle –
I’m very enthused to start some art journal projects. I’m also a writer & craft teacher to little ones. I’m always looking for projects that allow me to blend my interests. Thanks.
Merry Christmas,
Grace
Thanks Grace! Hope you have fun creating! Happy holidays to you also! 🙂
I love this tutorial but I have a suggestion for a change. Instead of ripping pages out, use a jumbo glue stick or gel medium to glue pages together into groups of 4-5 pages. This adds strength to the pages but can also add a little bulk once you start gluing in scrapbook paper. I tend not to glue in a lot of paper to my journals ( I do mostly stamping or painting) so that works perfect for me. So glad I found your site!
Thanks Julie! If you like thick chunky journals then keeping in the pages is definitely an option! That is one of my fav. things about art journaling – there are no steadfast rules, lol. 🙂 I like ripping them out so it’s not quite so bulky, but gluing them together definitely does work!
Yeah, so you totally inspired me to convert a comp notebook into an art journal. 🙂 So far, I’m just gessoing the pages, not ripping any out and not gluing them together. I like that they are strong but floppy, but they’re just a bit too floppy, like vinyl, so I think I’ll try your idea of collaging paper scraps on them first and then splodging on some gesso.
I read this tutorial and thought it sounded great…but I kept reading things like its only 94¢ ….not very thick not well made and it hit me what a waste of time it would be to put so much effort and other expenses into what will be a journal that someone…maybe kids would one day want to keep as a keepsake…
So not to sound crabby….shouldn’t more quality products be used to make a keepsake? Art supplies are a luxury for many people….expense is a factor in what I use in regarding some things…but I absolutely need a good foundation…its just not practical to spend time with cheap paper and covers when I am investing much time and products to achieve a one of a kind…
Sorry if this seems trite….I am considering art journals as a form of hobby and art…but not sure of what I would do with mine when finished…I have two grown sons whose wives certainly would not want them and my grown sons could not appreciate them either…so this may not be an artful expression for me after all…but you have a nice website
Hi Stranger! You did not sign your name so I don’t know who you are, so apologies if I don’t use your name. IMHO I’ve thought of some of the same thing you have… For me, art journaling is for personal pleasure, to gain insight, to create an entry of what was going on in my life at the time… just for me. I don’t expect my kids to look through it or take an interest… that being said, make sure that whatever you decide to add to your journal is not going to embarrass you or people who you know. (Don’t let it come back to you.) I’m totally OK with the thought that my journals wont last and will never be in display at the Smithsonian or the Louvre LOL… totally OK with that. I’m not Emerson Waldorf so no one is going to study my journals after I’m gone. So, I did go to the local department store when they were having their school supplies sales and bought the .99 cent composition notebook in this blog for .50 cents… can’t beat that price, bought six of them… should carry me for a year or so. Also I don’t mind if it looks a little “fat” so I did not remove any pages but I did what another reader suggested and “glued” two pages together then added the bits of paper to thicken it (used some junk mail… LOL works for me!) with gesso on top (.50 cent disposable brush, leaves nice brush marks, I like the texture it makes). So, for me, cheep is good because I will never worry about “ruining” a nice expensive journal with my silly musings, belly aches, grocery lists, found recipes, zentangles, sketches, movie tickets stubs, business cards that matter to me ATM – and whatever else that fancies my mind… Remember, content is everything, container… not so critical… after all, have you ever recycled an empty jar to store something? LOL – Have a great day!
Hello Chelle, I found this blog post so inspiring! I tried it out immediately on a hardbacked notebook I found in a charity shop for £1 (I live in the UK). I tore out some of the pages and collaged the rest with scraps of paper from old books. I’m thrilled with the end product. I’m quite new to art journaling/sketchbooks but I like the idea of creating something individual and unique to put my artwork/photography in. Not quite sure yet what I’m going to put in it ~ but I’ll know the right thing when it comes along! Thank you for the inspiration!
Kind regards, Evelyn
You inspire me to do what I haven’t got to yet, prepared the book by tearing out pages, now to start the “spit n paste”! Thanks, youre a star.
Hello all. First of all there is a group on facebook called Junk Journal Junkies, awesome bunch of ladies and ideals. I have been making these comp. books for a while now. I junk them up use as a art journal and diary/planner agenda type of book. I love them. I don’t rip out pages I do glue them and add papers and file folders throughout the book. I glue in calenders and put in stickers and washi tape. Gesso and paint I do just whatever the mood hits me to do. I do however hope one day my grand babies will look through them and know they had a creative granny. I love doing this to comps and to regular hard back books.I don’t care what happens to them after I’m gone. It’s more of a therapy for me. So good luck to all who adapts to this ideal.
By the way love this blog.
Hi Chelle, I recently finished making the composition journal! I love it. It was quite a bit of work but I am currently doing a second with the pages I ripped out. The only thing I found, and I may try a little different approach is that working from front to back twisted the spine that it’s now rounded. But, you know what? It really adds to it. I have had many comments and requests to make for others. So, I told them I’d gladly show them how, that’s it! So in my second attempt, I think as I thicken the pages I will try alternating as I go. Front, back, front, back. This might keep the spine a bit straighter. The pages I tore out of the first composition book, I am thickening the pages front and back as individual event pages. I have, for both used Scrapbooking paper that I wasent very fond of, old receipts, junk mail, wrapping paper, napkins, whatever I could find. I am not sure how I will put the pages together yet. Possibly an old book cover and back and large rings to keep in all together. Thank for introducing this concept to me, I love the multitude of colour on the pages and the very tattered edges of the paper. I will upload you a pic so you can have a visual on my journal. Thanks again Chelle!
Thank you so much for sharing your awesome techniques. I will definetly use your ideas in my future art journals
Does Gesso make the pages thick enough so that one doesn’t have to add extra paper if they don’t want to?
Hey there!
I apologize for commenting on such an old post, but I stumbled across this tutorial on pinterest and absolutely loved the idea. I had a ton of comp notebooks, so I got started right away.
Only problem… I was thinking that I should keep in all of the pages, because I wanted all of them to be as full as they could be.
After spending hours of working on making the pages thicker (and a lot of mod podge :P), I’m realizing now that I really should have followed the step of tearing out pages first. After getting done kicking myself repeatedly and harshly (actually, still not done kicking myself), I’m trying to figure out what to do. I got started 8 books, because I wanted to do some for myself and some as gifts, and I figured if I’m doing the same steps over and over again, might as well make an assembly line. The books are getting thick already, and I still have hundreds of pages to do. I want to tear out pages now, but I’ve already done the first 10+ pages on all of them, so I can’t tear out any from the back or front.
Would it work to tear out pages just from the middle? I’ve spent hours of work on these already, and would really prefer NOT to start all over again. (not to mention the money on mod podge… I tried Elmer’s but it curled the pages.)
So… Yeah. If you have any suggestions for me, that would be very appreciated. Thank you very much for this wonderful tutorial, and I will make certain to actually follow it in the future. 😛
Hi Chelle,
I am new to art journaling but love to find new techniques that I can easily incorporate into my learning. I’ve attempted a few pages but my problem is that once I gesso a page and let it dry the pages curl up. No matter what I do to them afterwards I just cannot get them to lay flat. Is there a tip you or anyone else would have for me? I sure would appreciate it. Thank you.
What a wonderful Idea. I plan to start one today. It is so difficult for me to work in a pricey art journal. This is a very easy way to overcome that. G