
What do you do when you’re ready for some signs of spring in the middle of winter? Why, you paint spring daffodils in your art journal of course!
And what do you do when you posted this video on YouTube in April of last year but never actually added it to your website? Well, we add it in September and thank you all so much for being patient and understanding that sometimes life is crazy. 🙂I thought about waiting until spring rolled around again in a few months, but then I was watching it again today and forgot just how many layers are involved in the page. At first glance you might not realize just what all is happening underneath in all those layers!

Layering in Art Journaling is One of Those Things to Practice!
Building up layers in my art journal pages and mixed media work is probably my favorite part of creating. It’s also one of those things many people are afraid to do at first.
While I’ve been keeping sketchbooks and notebooks since high school, it really wasn’t until I started building up these layers in the pages that I really felt like, “oh wow, that’s so cool” whenever I would look at my pages in my art journals.
So, just because I wanted to share the layer by layer process of this page, you now get to see more details of a video of painting these mixed media daffodils in September. Yeah, I’m sure I could get a little punny here and call myself a late bloomer, right?
But those who know me well also know that it is very much characteristic of me to be fashionably late to season.
My friend Becky makes these beautiful cards on Etsy for the holidays each year and I joked with her that I was thinking of ordering some just to randomly send them to people in the middle of summer to say, “Hey, at least I am TRYING here.”
Shhh…don’t tell anyone, I am also wearing white after Labor Day. #whyidonthaveafashionblog #allmyclothesarecoveredinpaintanyways
Daffodils Mixed Media Art Journal Page in Layers
Layer 1: Ripped Book Pages Over a Page With Some Scribbles/Doodles

I started this page by first finding some Ripped Up Book Pages and using Liquitex Matte Gel Medium to get them down on the paper.
Layer 2: Stencils & Paint

Next, it was time for some stencils and Liquitex Soft Body Paints. I also at some point used Golden Titanium White Paint in this video – it is more translucent, so you’ll see me switching a lot between white paints because I always forget that whenever I go to grab it!
Yes, it is true – I cannot make a single video without a little bit of help from at least one cat around here. This is a Himalayan fluffy kitty – so him and paint do NOT mix so well! Got him out of there pretty fast, although we can’t blame him for wanting to help!
Also – I love, love the bubble/pebble design stencil I used in this page, but it seems like this Folk Art Pebble Stencil is probably the closest thing to it currently, which appears to have a slightly different design.
I bought the stencil many, many years ago and as you can probably tell in the video it is very well loved! Right up there with the cat, of course.
Layer 3: More Paint!

I did several layers of paint before finally adding the flowers.
Tip: In between colors be sure you let each layer dry first! This will help prevent muddy colors mixing and blending together.
I LOVE my Nicole Heat Gun Tool for this! I purchased it in 2014 and it is still going on strong.
Some blue, some pink – and then lastly came some yellow. Again, make sure you are letting each layer dry in between! This underpainting acrylic paint technique would be a disaster with a color like yellow on top if the blue and pink weren’t completely dry first!


At this point I decided the background was *mostly* complete, and moved onto the next layer: painting on the flowers.
Layer 4: Painting the Daffodils

I started first with some rough shapes of the daffodils in white paint. This helps make them lighter in contrast with the background.
It then dawned on me after I painted the daffodils white that I wanted the flowers to be yellow, but there was too much yellow in the background! So, I filled in some of the spaces around the flowers with blue paint.

Once the blue was all filled in, now I could paint those flowers yellow! In hindsight, I kind of wish I would have kept a couple of them with more white with just a few yellow highlights, but I am still pretty happy with the results. I’ll try that for when I attempt to paint flowers next spring maybe. 🙂

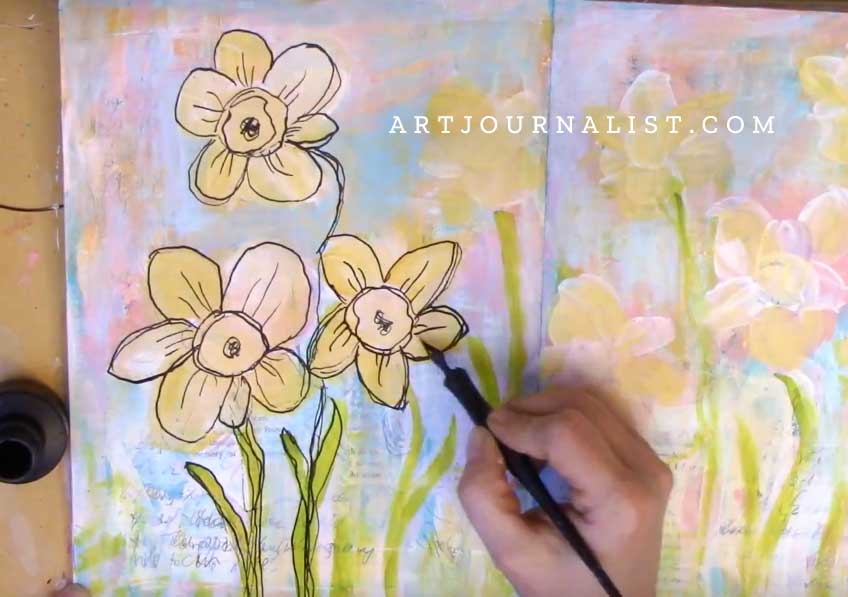
Layer 5: Ink Pen Outline and Details
I love using my calligraphy pens and ink in my artwork. I may not be very good at actually doing calligraphy lettering – however I do absolutely love it for creating outlines and messy free-flowing types of doodles.
{See My Related Post: When You Hate Your Handwriting!}
I usually start by outlining with my Speedball calligraphy pen that I use with Higgins Black Magic Waterproof Ink.
It’s very important if you use this kind of ink to start with the top and work your way across the opposite direction your hand goes. So, for example, I am right-handed, so I usually start with the left top and work my way down and then across towards the right.
If you were left-handed, you would likely want to start at the top right and work your way down and then across towards the left.
Of course, if you forget this, you can always just take a break to let things dry first or just turn the paper upside down like I did.

Don’t be afraid to turning your artwork upside down when you are creating! This is something I see so many new artists as well as my kids do all the time – they will not move that piece of paper once they start creating.
Sometimes it gives you new perspective, but it always makes creating a lot more comfortable! No need to stretch or risk smearing something!

Finally I added the last details with my white Uni-Posca paint pen. The pen splattered a bit, but I actually like those splatters.
Here’s the Finished Page

All in all, I am really happy with how this page came together. All those layers upon layers really add a lot of depth and nice details to the page.
And when you see all those layers, it’s totally worth looking at out-of-season daffodils, right? 🙂
Here’s a List of Supplies Used in This Art Journal Page
I am often asked what supplies I use in my art journal pages, so I am listing them here. You don’t have to use these though of course, they are just here for reference.
I’m a big fan of being frugal in art journaling – use what you have and whatever is available to you! What matters most is you are creating something!
- Dylusions Creative Journal
- Liquitex Matte Gel Medium
- Liquitex Soft Body Acrylics
- Golden Fluid Acrylics Titanium White {Translucent White Paint}
- Uni-Posca Paint Markers
- Speedball Dip Pen
- Higgins Black Magic Waterproof Ink


If you enjoyed this post and are interested in more details on any of the art journaling techniques used on this page, you may also like these posts:
- How to Use a Dip Ink Calligraphy Pen in Your Art
- Tips for Painting With Acrylics
- 12 Easy Acrylic Paint Techniques
- Understanding Acrylic Paint Brushes 101
Want to stay updated on all the latest videos we create? Be sure to !
I hope you enjoy this step by step breakdown of how I like to build up all the different layers up in art journaling pages. And of course, if you make any art you know I would love to see it! Join our Facebook group and share your creations with us!
And of course, if you have any questions about the process in creating this page, of course do ask in the comments below – I’m always happy to help!
Join our facebook group!

Share what you’re creating and working on, ask questions + connect with over 4000 creative artjournalists for inspiration + ideas!